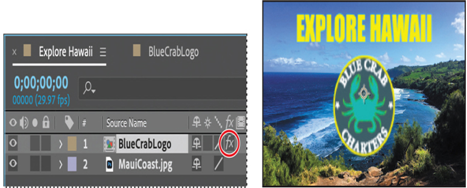
Now you’ll return to the main composition, Explore Hawaii, and apply an effect to the BlueCrabLogo layer. This will apply the effect to all of the layers nested in the BlueCrabLogo composition.
- Click the Explore Hawaii tab in the Timeline panel, and then select the BlueCrabLogo layer.
- In the Properties panel, change the scale to 250%.
The effect you create next will be applied only to the logo elements, not to the background image.
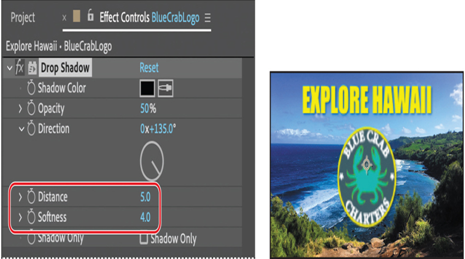
3. With the layer still selected, choose Effect > Perspective > Drop Shadow.
A soft-edged shadow appears behind the nested layers of the BlueCrabLogo layer—the logo graphic and the words Explore Hawaii—in the Composition panel. You can customize the effect using the Effect Controls panel.
4. Choose Window > Effect Controls if the Effect Controls panel isn’t already open. In the Effect Controls panel, make sure that the drop shadow’s Distance is 5, and increase its Softness to 4. You can set each value by clicking the field and typing the number or by dragging the blue value.
The drop shadow is nice, but the logo will stand out even more if you apply an emboss effect. You can use either the Effect menu or the Effects & Presets panel to locate and apply effects.
5. Click the Effects & Presets tab to open the panel. Then click the arrow next to Stylize to expand the category.
6. With the BlueCrabLogo layer selected in the Timeline panel, drag the Color Emboss effect into the Composition panel.
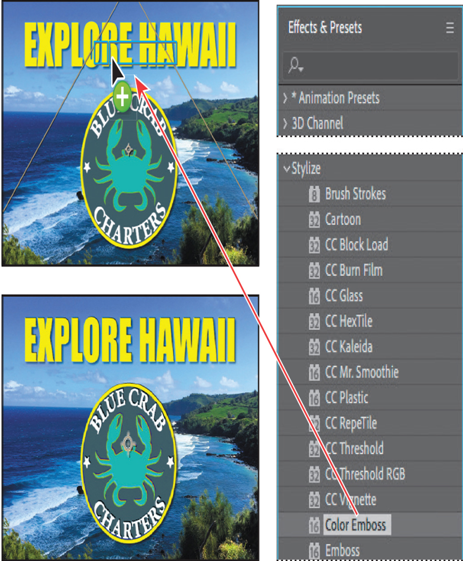
The Color Emboss effect sharpens the edges of objects in the layer without suppressing the original colors. The Effect Controls panel displays the Color Emboss effect and its settings below the Drop Shadow effect.
7. Choose File > Save to save your work.
Applying and controlling effects
You can apply or remove an effect at any time. Once you’ve applied effects to a layer, you can temporarily turn off one or all of the effects in the layer to concentrate on another aspect of your composition. Effects that are turned off do not appear in the Composition panel, and typically aren’t included when the layer is previewed or rendered.
By default, when you apply an effect to a layer, the effect is active for the duration of the layer. However, you can make an effect start and stop at specific times, or make the effect more or less intense over time. You’ll learn more about creating animation using keyframes and expressions in Lesson 5, “Animating a Multimedia Presentation,” and Lesson 6, “Animating Layers.”
You can apply and edit effects on adjustment layers just as you do with other layers. Note, however, that when you apply an effect to an adjustment layer, the effect is applied to all layers below it in the Timeline panel.
Effects can also be saved, browsed, and applied as animation presets.